


Next: 8.1 Installation
Up: Video Conferencing Manual
Previous: 7.6 Powerpoint Slides on the ViewStation
8 NetMeeting
MicroSoft Windows NetMeeting is a tool for real-time
PC-to-PC screen sharing and for remote control of Windows PC's across the network.
It can be used in parallel with the main
video conferencing system so that any site that has
connected to the NetMeeting session can share a
computer display or application with all of the other
sites. If you also allow control, sites can both see and use
the programs at the other sites.
For example, a software demonstration or tutorial can be shown
"live" at all sites in large format using their LCD projectors,
in parallel with video and audio from the video
conferencing system. The remote control capability enables fully
interactive tutorials in which the participants can interact with a program
running at the originating site,
When you execute NetMeeting on your site's PC, you will see the
interface shown below:
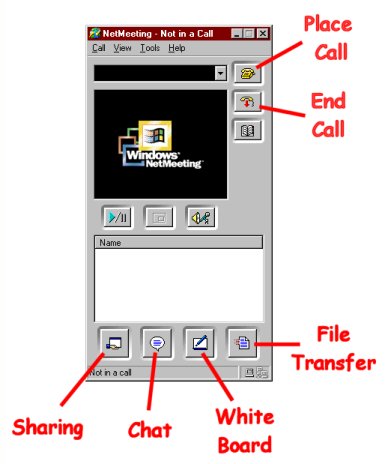
NetMeeting interface
To communicate with another site, first establish audio communication with
that site and have them start their copy of NetMeeting.
As you cannot change the computer's display resolution
or color depth when NetMeeting is running, it is best to set
all computers that will participate in a NetMeeting presentation
to the same display resolution and color depth before running the
software.
Then click on the Place Call button, enter
the IP number of the far PC (the pull-down menu to the left
of this button remembers recently-called IP numbers), and click Call.
The far site will see an "incoming" prompt and must Accept your call
(unless it has been configured to accept NetMeeting calls automatically).
The Name window will display the user names at both sites once the
connection has been made.
Open any application that is to be shared between the sites,
then press the Sharing button to bring up a menu of running
applications. Click on those you wish to share. The far site
will open a new window displaying that application. Its display will
be identical to yours only if you set the resolution and color depth
identically before starting NetMeeting.
Using Remote Desktop Sharing, sites can
access a computers shared desktop. The first time that Remote Desktop
Sharing is used, it must be initiated by an administrator for that machine.
Once connected, they
can work in the host's shared desktop with any program that the host
computer has access to.
Only one site can be in control of a shared program at a
time. If controllable appears in the title bar of the shared
program window, the site who shared the program has control now
but is allowing others to work in the program.
If the mouse pointer has a box with initials, then another
site has control of the program.
All sites can share programs during a meeting.
The shared programs of each site appear in separate shared
program windows on the other sites' desktops.
A Chat feature in NetMeeting lets all sites type messages for the others
to see.. If any site in a meeting runs Chat, a shared Chat window appears on
all other sites' screens. (This might also be used during a video conference
for backchannel communication, e.g. about audio or video difficulties,
without intruding on a meeting's discussion.)
NetMeeting Chat files can be saved, e.g. as HTML, for use after a meeting
as appropriate.
Whiteboard lets everyone in a meeting draw and
type simultaneously, but the mouse-based interface is
awkward for anything beyond very rough sketches.
It is probably simpler to send sketches from a conventional whiteboard
with a video camera, or from paper using the document camera.
Whiteboard items may however be emphasized with a Highlighter or Remote
Pointer, and you can copy and paste items between the Whiteboard and other
programs if you want meeting participants to see
particular items without sharing access to your site's
entire desktop.)
It is also possible to send a file to the other sites during a meeting:
- Click the Transfer Files button.
- In the File Transfer dialog box, click the Add File button, and select
the files you want to send.
- Click the name of the site you want to send the file to,
or click All to send it to all sites in the meeting.
- Click the Send All button.
To specify where to save received files:
- Click the Transfer Files button to open the File Transfer dialog box.
- On the File menu, click Change Folder, and then click the folder where
you want NetMeeting to save received files.
To receive a file, click Accept and close the dialog box.
Click the End Call button to terminate a NetMeeting session.
Subsections
Next: 8.1 Installation
Up: Video Conferencing Manual
Previous: 7.6 Powerpoint Slides on the ViewStation

Home |
Contact Us |
Directories |
Site Map |
Help |
Search
|

